Today, we are going to take a second look at the web performance of the strangePy website by using a Google Lighthouse performance audit. A few weeks ago, Google released Lighthouse 6.0 with a few updates. We may take an in-depth look at those updates in a future article, but today we are going to focus on some quick performance improvements to the website and hopefully get the performance and accessibility scores up to 100!
First off, let’s take a look at the current performance. You can either use the online auditor or open your browser’s developer tools and click the “Audit” tab. For this analysis, we are going to focus on Desktop and save Mobile for another day.
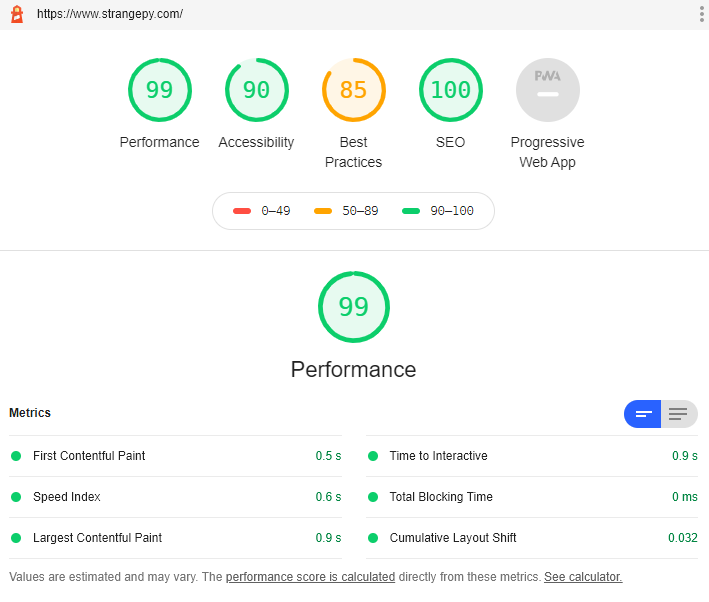
Before Today’s Improvements
Let’s start off by taking a look at the current high-level scores produced by the Lighthouse auditor. The performance score is already at 99, but accessibility is currently at 90.
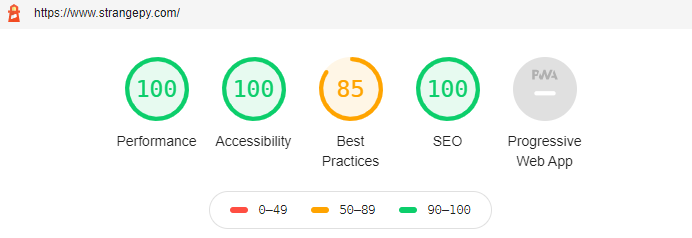
After Today’s Improvements
By the end of today’s article, we will have improved both the performance and the accessibility score to 100!
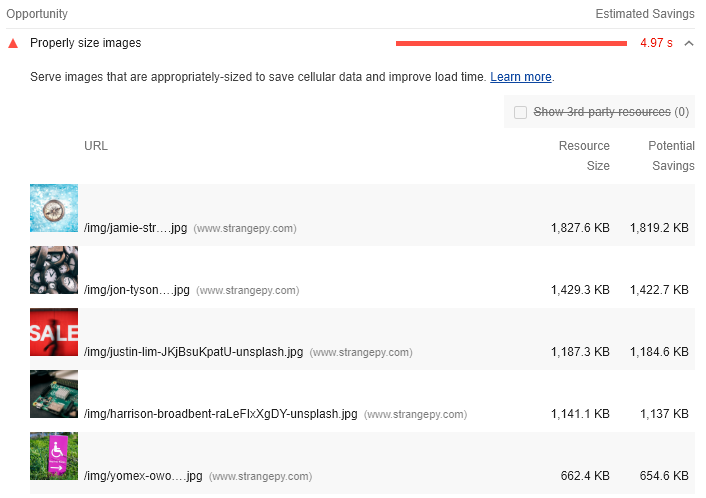
Properly Size Images
This optimization refers to when the downloaded size of an image is significantly larger (4 KiB) than the rendered size of the image. This leads to transferring larger file sizes across the network than is needed, and thus can slow down your web page. You can find a full explanation here. There are three common ways to solve this problem.
- Generate separate image files and create references to the proper size using media queries and viewport dimensions
- Pass the creation of multiple image sizes along to your CDN
- Switch all of your images over to vector-based formats (like SVGs) that can scale to any size
CDNs usually charge for image optimization services, so that option is not ideal for this website. Swapping all images to SVGs would be time-consuming, but entirely possible. Ideally, we would break each image on the website into multiple files of differing sizes.
There would be one set of image sizes for each range of common screen sizes, and this would optimize the balance between website speed and high-quality images. There are Jekyll plugins that could do this for us, but unfortunately GitHub pages does not support any of them outright the current list of Plugins supported by GitHub pages, so we would have to build the strangePy website locally and re-deploy it. Long-term, our plan should definitely include this option!
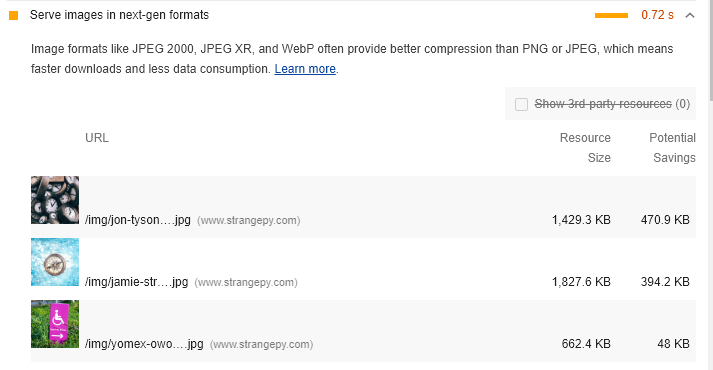
But, is there anything that we could do today to improve image sizes? Yes! A key component of this optimization is that the audit does not recommend having the downloaded image be 4 KiB larger than the rendered image. We can run the images through an optimization software to reduce their size, and then re-upload these images. For a few minutes of work, you can see this did indeed make a difference to the performance score!
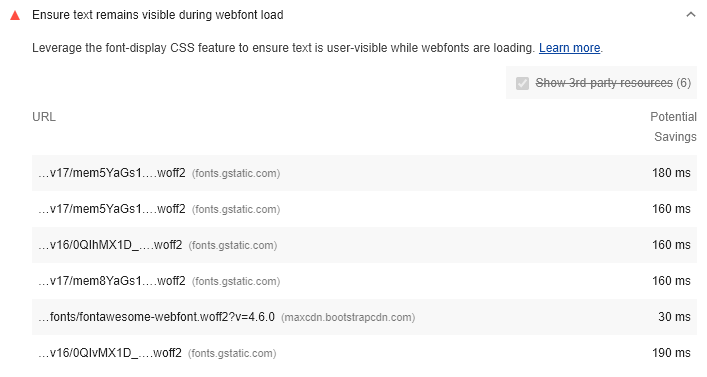
Ensure text remains visible during webfont load
This optimization is entirely based around avoiding a Flash of Invisible Text (FOIT) on the page during rendering. Users cannot read invisible text, so it is best if the text remains visible and the font styles are swapped out as the font files finish downloading. The key to fixing this issue is that the font-display: swap parameter needs to be added to all font files. You can read the full explanation of the recommendation or some additional detail around the values. For a visual aid, there is an excellent demo of the different font-display options.
Google Fonts
The fonts referenced in this performance audit are nearly all open source Google fonts and we do not have any control over those font files unless they are hosted locally. Fortunately, in May 2019 Google added support for the font-display parameter to their files and now you can simply add &display=swap to the end of the URL. If you would like to read more, this article presents some solutions to this problem without adding the URL parameter.
Now that we know what to do, we can simply pull up the base.html file within the _layouts folder and add &display=swap to the end of the Google font URLs. Excellent! Now, the only file left without font-display: swap is the font awesome file.
Icons
Unfortunately, this file is not quite as easy to solve. Font awesome provides many of the icons on the strangePy website, and as such this file is referenced within each layout. As an example, you can pull up base.html in the _layouts folder and you can see a reference to head.html. Within the head.html file, there is a reference to common-ext-css like shown below.
{ % if layout.common-ext-css % }
{ % for css in layout.common-ext-css % }
{ % include ext-css.html css=css % }
{ % endfor % }
{ % endif % }
Then if we look at the referenced ext-css.html file we can see:
{ % if include.css.sri % }
<link href="{ { include.css.href } }" rel="stylesheet" integrity="{ { include.css.sri } }" crossorigin="anonymous">
{ % elsif include.css.href % }
<link rel="stylesheet" href="{ { include.css.href } }" />
{ % else % }
<link rel="stylesheet" href="{ { include.css } }" />
{ % endif % }
This will pull through the flat link to each CSS file. If we wanted to self-host the CSS file, then we may be able to add the font-display: swap parameter. However, image icons are not meant to be swapped out and display in the same manner as fonts. Zach Leatherman wrote an excellent article about some of the issues with icon fonts. The bottom line is that font icons are not recommended for web performance, and you may be better off switching to SVGs. This project is a bit more involved than today’s article, so we are going to save this one for next time!
Avoid using enormous network payloads
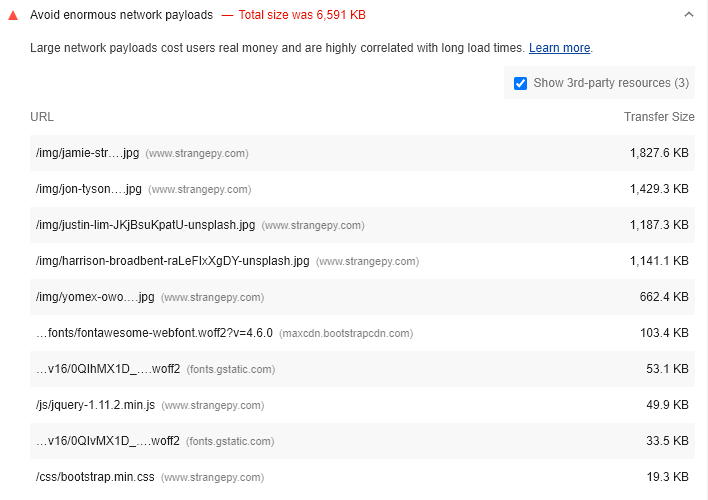
This optimization looks at the total network payload of your page’s network requests, and recommends reducing the transfer size of large requests. You can read a more in-depth explanation here, but the bottom line is that the auditor will flag pages with a total network request greater than 5,000 KiB. Fortunately for us, this recommendation was fixed by compressing the large images, and it no longer applies! We may revisit this topic for additional network transfer size savings in a future article, so keep an eye out for that.
Avoid Using Document.Write()
So document.write() has been falling out of favour for a long time. There are better alternatives, and document.write() will often slow your page down. In the future, browser may even remove support for this method, so we agree with Lighthouse’s recommendation to remove all references to document.write().
You may ask, “If you know this is not a best practice, then why is it being used on the strangePy website??” This website was built using the Beautiful Jekyll theme, so a lot of the code was written by other developers. Some of the code was written years ago or may be legacy code, so this is one of the drawbacks of using third-party code in your project.
Luckily, it looks like there is only a single use of document.write() on this page. The auditor has also included a reference to the exact line of code that I need to modify within the footer-scripts.html file. This code snippet is essentially checking for jQuery on the page and loading jQuery in if it does not already exist.
      <script>
      	if (typeof jQuery == 'undefined') {
          document.write('<script src="/js/jquery-1.11.2.min.js"></scr' + 'ipt>');
      	}
      </script>
We could replace this code with something like the snippet below.
var newScript = document.createElement("script");
newScript.async = true;
newScript.src = "";
var scriptZero = document.getElementsByTagName('script')[0];
scriptZero.parentNode.insertBefore(newScript, scriptZero);
However in this case the jQuery library is the only one being loaded in this manner (and long-term we plan to remove jQuery entirely), so we can simply replace the entire statement with the following.
<script src=""></script>
This removes our reference to document.write(), but if you would like to learn more there is
an article about script injection alternatives here and a
StackOverflow thread on the drawbacks of document.write here.
User Scaling Accessibility
We have already covered a lot in this article, but we are going to make one more quick update. This recommendation is under the Accessibility category, limits either the user scalability or the browser zoom of the page. There is an in-depth article about this optimization.
The text of the optimization is quite specific: [user-scalable="no"] is used in the <meta name="viewport"> element or the [maximum-scale] attribute is less than 5.
For this website, we can see the following within the head.html file:
<meta name="viewport" content="width=device-width, initial-scale=1.0, maximum-scale=1.0, viewport-fit=cover">
So audit is failing the maximum-scale=1.0 parameter. We can change that value to 5.0 to resolve this accessibility issue.
Wrap Up
We covered quite a few things today, but don’t forget to take things one piece at a time. Revisit articles or re-read content again to make sure you understand it. There is no replacement for hands-on learning, so I encourage you to set up a simple site and test out some of these changes yourself!! At the end of the day, we learned another component of improving web performance, and we successfully improved the performance score!
Next Time
As always, software development is an iterative process and we did not cover everything today. There are quite a few recommendations left for next time, so keep an eye out for part three of this series!
